Last updated on March 4th, 2025 at 02:38 pm
Can you install solar panels yourself? Are you ready to take control of your energy consumption and contribute to a sustainable future? If so, you’ve come to the right place. In this article, we will guide you through the process of solar panel installation and provide you with valuable insights on how you can do it yourself.
By taking this DIY approach, you can save money, gain a deeper understanding of solar technology, and contribute to a greener future. This article will provide you a step-by-step guide that will equip you with the knowledge and confidence to embark on your solar panel installation journey.
Why DIY installation?
When it comes to installing solar panels, taking the do-it-yourself (DIY) route has some incredible advantages. Not only will you be able to bask in the glory of your handiwork, but you’ll also reap some significant benefits, starting with the cost savings.
Let’s talk about money. Professional solar panel installation can come with a hefty price tag. For example, the labor cost of installing a 5 kW solar panel is around $3000. By opting for the DIY approach, you can significantly reduce those costs. You’ll be able to skip the labor fees and keep more money in your pocket. It’s like giving yourself an instant discount on your solar panel system.
But it’s not just about the money. DIY installation allows you to have a deeper connection with your solar panel system. You’ll gain valuable knowledge about how it works, empowering you to troubleshoot and maintain it with confidence. No more relying on someone else to fix minor issues or answer your questions. You’ll become the resident solar expert.
There’s also a great sense of accomplishment that comes with DIY installation. You’ll be able to proudly say, “I did that!” as you admire your solar panels soaking up the sun’s rays. It’s an empowering feeling to take control of your energy future and make a tangible impact on the environment.
And let’s not forget the timeline. When you hire professionals, you might have to wait for their availability, which can delay the installation process. With DIY installation, you can set your own pace. You’ll have the freedom to work on the project when it’s convenient for you, making it a flexible and satisfying experience.
So, if you’re up for the challenge, DIY solar panel installation offers you the chance to save money, gain knowledge, and revel in a sense of accomplishment. It’s a win-win situation that puts the power in your hands, quite literally.
Important factors to consider before solar panel installation
Before installing solar panels, there are several important factors to consider. First, assess your roof’s suitability and structural integrity. Next, analyze potential shading issues and address them if necessary.
Evaluate your energy consumption and determine the appropriate panel size. Consider the upfront costs, available incentives, and long-term savings. Lastly, research and comply with local regulations. These steps will help you make informed decisions and ensure a successful installation.
Read more in detail about: Top 5 Most Important Factors to Consider Before Solar Panel Installation
Components and tools necessary for the solar panel installation
When it comes to installing solar panels, there are several components and tools that you’ll need to have on hand. Here is the list of them:
Components of solar panels you need
-
Solar Panels: These are the main components that convert sunlight into electricity. They are made up of multiple solar cells, which capture the sun’s energy and generate direct current (DC) electricity.
-
Mounting Brackets/Racks: These are used to securely attach the solar panels to the roof or any other suitable location. They provide stability and ensure proper positioning of the panels for maximum sunlight exposure.
-
Solar Inverter: The solar inverter is responsible for converting the DC electricity generated by the solar panels into usable alternating current (AC) electricity. AC electricity is what we typically use in our homes and businesses.
-
Wiring and Connectors: These are essential for connecting the solar panels to the inverter and other electrical components. Proper wiring and connectors ensure the efficient and safe transfer of electricity.
-
Combiner Box: The combiner box is used to combine the output of multiple solar panels into a single output. It helps streamline the wiring and simplifies the connection to the inverter.
-
Battery (optional): While not essential for all solar panel installations, a battery can be added to store excess electricity generated by the panels. The stored energy can then be used when sunlight is limited or during power outages.
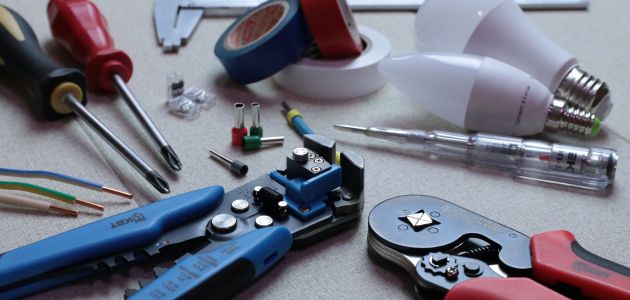
Tools you need
- Drill
- Screwdriver
- Wire cutters/strippers
- Multimeter
- Ladder (if needed)
- Safety equipment (gloves, safety glasses)
- Tape
DIY solar panel installation: 10 steps to follow
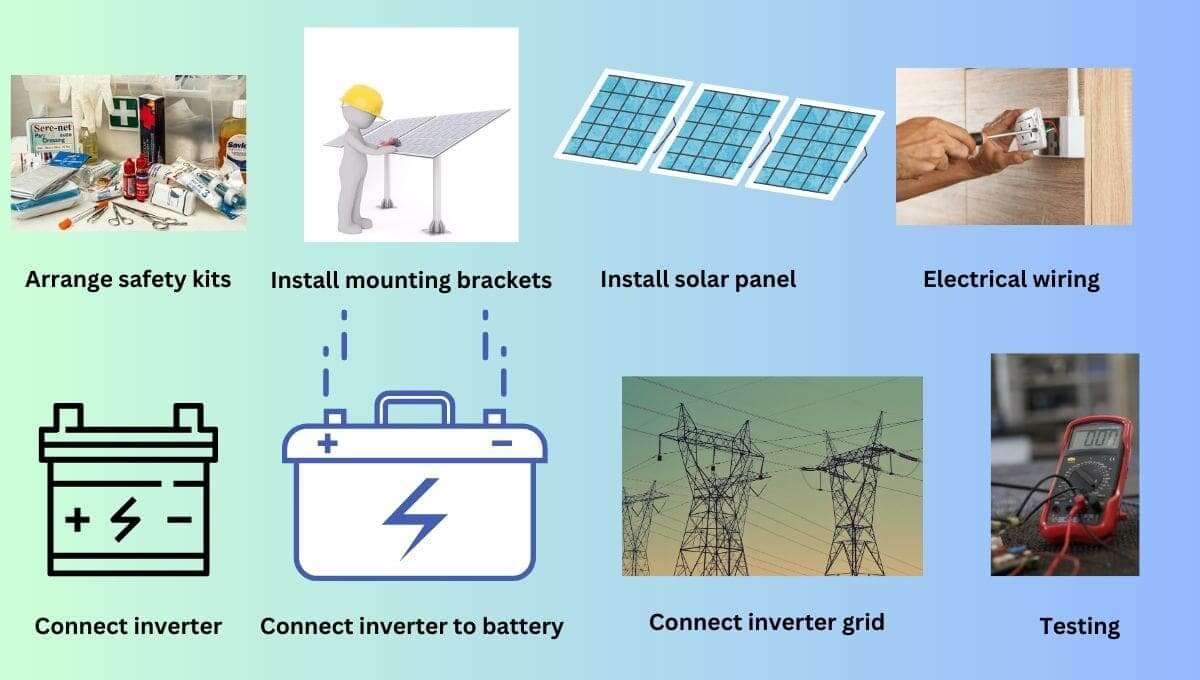
Step 1: Check the mounting options
When it comes to deciding the mounting option for your solar panels, it’s important to consider factors like your roof type, ground location, and specific conditions at your site. There are a few common mounting options to choose from, each with its own advantages.
Flush Mount: This option involves securing the solar panels directly onto your roof’s surface. It provides a sleek and integrated look. It’s suitable for roofs with good sun exposure and minimal shading. However, it may require additional roof reinforcement depending on the weight and size of the panels.
Tilt Mount: Tilt mounts allow you to adjust the angle of your solar panels to optimize sun exposure. You can tilt them towards the sun for maximum energy production during different seasons. This is particularly beneficial if your location experiences significant variations in sun position throughout the year. Tilt mounts are commonly used on roofs or ground-mounted systems.
Tracking Systems: Tracking systems are motorized mounts that follow the sun’s movement throughout the day, maximizing solar energy capture. There are two main types: single-axis and dual-axis. Single-axis trackers move the panels on a single plane, usually from east to west. Dual-axis trackers adjust the panels both horizontally and vertically, optimizing their orientation. While tracking systems can increase energy production, they are more complex and costly compared to fixed mounts.
When deciding on the mounting option, assess the sun exposure and shading on your property. Consider the orientation and tilt angle that will allow the panels to receive maximum sunlight. Additionally, evaluate the structural integrity of your roof or the ground where the panels will be mounted.
Step 2: Safety first!
Safety should always be the foremost concern when it comes to solar panel installation. Before you start any work, prioritize your well-being by wearing appropriate personal protective equipment (PPE) such as gloves, safety glasses, and a hard hat. These will help protect you from potential hazards like sharp edges, falling debris, or electrical shocks.
Additionally, ensure that you have a sturdy ladder or scaffolding to safely access the installation area, especially if you’re working at heights. Take the time to assess the surroundings for any potential risks, such as unstable surfaces or overhead power lines. By following these safety measures, you can minimize the chances of accidents and ensure a smooth and secure installation process.
Step 3: Mount installation brackets
Mount installation brackets are an essential component of solar panel installation. These brackets provide the structural support needed to securely attach the solar panels to the mounting surface, whether it’s a roof or the ground. When installing the brackets, it’s important to follow the manufacturer’s instructions and ensure proper alignment and spacing.
Use appropriate fasteners, such as bolts or screws, to securely fasten the brackets in place. Consider factors such as the angle and orientation of the brackets to optimize the solar panel’s exposure to sunlight. Properly installed mounting brackets will provide a stable foundation for the solar panels, ensuring their longevity and efficient operation.
Step 4: Install the solar panels
Now comes the exciting part – installing the solar panels! Take each solar panel and securely attach it to the mounting structure using the hardware provided. This may involve using bolts, screws, or clamps, depending on the mounting system. Make sure to follow the manufacturer’s instructions carefully to ensure a secure and reliable installation.
As you install the panels, you’ll also need to connect them together using the connectors or wiring specified by the manufacturer. This ensures that electricity generated by each panel can flow seamlessly through the system. Double-check the connections to ensure they are tight and secure.
When positioning the solar panels, consider the importance of spacing. Leave adequate space between panels to allow for proper ventilation and access for maintenance. This ensures that the panels can operate at their optimal efficiency and facilitates any necessary cleaning or repairs in the future.
Step 5: Electrical Wiring
Now it’s time to tackle the electrical wiring for your solar panel system. This step is crucial for ensuring that the power generated by the panels reaches the solar inverter efficiently and safely.
First, you’ll need to run the electrical wiring from the solar panels to the location where the solar inverter will be installed. This involves carefully planning the route and determining the appropriate wiring method. One common method is to use conduit, which helps protect the wires and ensures compliance with electrical codes.
When it comes to connecting the solar panels, you have two options: series connection and parallel connection. Let’s explore each one.
Series connection: In a series connection, the positive terminal of one solar panel is connected to the negative terminal of the next panel, and so on. This creates a string of panels where the voltage adds up. The advantage of series connection is that it increases the overall voltage output, which can be beneficial when dealing with long wire distances or higher voltage systems.
Parallel connection: On the other hand, in a parallel connection, the positive terminals of all the solar panels are connected together, as are the negative terminals. This configuration keeps the voltage consistent while increasing the overall current capacity. Parallel connection is often used when the panels are located close to each other or when dealing with lower voltage systems.
Whether you choose a series or parallel connection depends on various factors such as system design, available space, and electrical requirements. It’s essential to consult the manufacturer’s guidelines and recommendations for your specific solar panel system to determine the most suitable connection method.
As you proceed with the electrical wiring, remember to adhere to all electrical codes and regulations. This ensures that your system is safe, reliable, and compliant with local standards.
Step 6: Install the inverter
Now it’s time to install the solar inverter, which is a crucial component of your solar panel system. Find a suitable location near the main electrical panel of your home to mount the inverter. This is typically in a utility room or garage, where it’s easily accessible.
Before connecting the inverter, make sure to turn off the power supply to the main electrical panel. Safety should always be a top priority. Once the power is off, you can proceed with the installation.
Next, connect the DC wires from the solar panels to the inverter according to the specified wiring instructions provided by the manufacturer. These instructions will guide you on how to properly connect the positive and negative wires from the panels to the corresponding terminals on the inverter.
Ensure that the connections are secure and tight to prevent any electrical faults or disruptions in the system. Take your time to double-check each connection to guarantee accuracy.
As you complete the inverter installation, take a moment to appreciate the important role it plays in converting the DC power generated by the solar panels into AC power that can be used in your home. It’s like the bridge that allows the solar energy to flow seamlessly into your electrical system.
Step 7: Connect inverter the solar battery
Once you have installed the solar inverter, the next step is to connect it to the solar battery (if applicable). If you have opted for a solar battery system to store excess energy, this step will allow you to make the most of your solar power generation.
To connect the solar inverter and the solar battery, you’ll need to follow the specified wiring connections provided by the manufacturer. It’s crucial to pay attention to the proper polarity, ensuring that positive and negative terminals are correctly matched. This will prevent any electrical issues and ensure the safe and efficient operation of your solar power system.
Take the time to secure the wiring connections properly, ensuring they are tight and well-insulated. This will help maintain a stable and reliable connection between the inverter and the battery, promoting efficient energy transfer.
It’s important to note that not all solar panel systems include a solar battery. If you don’t have a battery as part of your system, you can skip this step. However, if you do have a solar battery, connecting it to the inverter will enable you to store excess solar energy for use during periods of low sunlight or high energy demand.
Remember to consult the manufacturer’s instructions and guidelines throughout the connection process. If you have any doubts or concerns, it’s always wise to seek professional assistance to ensure a safe and reliable connection.
Step 8: Connect the inverter to the electrical grid
Connecting your solar panel system to the electrical grid involves working with the main utility power supply of your property. This step typically requires the expertise of a licensed electrician to ensure a safe and compliant connection. However, if you have the necessary knowledge and experience with electrical systems, you may be able to proceed with caution and follow local regulations.
Before attempting to connect your solar panel system to the grid, it is crucial to understand the electrical codes and regulations in your area. These regulations ensure the safety of both the grid and your solar panel system. It is recommended to consult with your local utility company or an electrical inspector to understand the specific requirements and obtain any necessary permits.
Here are the general steps involved in connecting your solar panel system to the grid:
-
Verify compliance: Ensure that your solar panel system meets the necessary safety and electrical requirements. This includes using approved equipment, proper grounding, and adherence to local codes.
-
Install a dedicated breaker: Install a dedicated circuit breaker in your main electrical panel to connect your solar system. This breaker will act as a disconnect switch, allowing you to shut off the solar system when needed.
-
Install a production meter: In some jurisdictions, you may be required to install a production meter to measure the amount of energy your solar panel system generates. This meter allows your utility company to monitor the energy fed back into the grid.
-
Connect the inverter: Follow the manufacturer’s instructions to connect your solar inverter to the main electrical panel. This involves wiring the inverter to the dedicated breaker and ensuring proper grounding.
-
Test and inspect: Once the connections are made, it is crucial to test the system and have it inspected by a qualified professional. This ensures that the installation is safe, compliant, and functioning as intended.
It’s important to note that while it is technically possible to connect your solar panel system to the grid as a DIY project, it involves working with high-voltage electricity and complex electrical systems. Any mistakes or improper connections can have serious safety implications and may also void warranties or insurance coverage. Therefore, it is strongly recommended to consult with a licensed electrician to ensure a safe and reliable grid connection.
Step 9: Start solar inverter
After completing the installation and connections, it’s time to power up your solar inverter and start harnessing the energy of the sun! The solar inverter plays a crucial role in the solar panel system by converting the direct current (DC) electricity generated by the solar panels into alternating current (AC) electricity, which is compatible with the electrical appliances in your home.
To start the solar inverter, follow these steps:
- Locate the power switch: Depending on the model of your solar inverter, you will typically find a power switch or button on the unit itself. It may be labeled as “On/Off” or have a recognizable symbol. Take a moment to locate this switch before proceeding.
- Ensure proper connections: Double-check all the connections between the solar panels, inverter, and main electrical panel. Make sure everything is securely connected and there are no loose wires or components.
- Check for safety precautions: Some inverters have built-in safety features, such as a ground fault interrupter (GFI) or overvoltage protection. Verify that these safety mechanisms are in place and functioning correctly.
- Turn on the inverter: Once you’ve confirmed the above steps, it’s time to turn on the inverter. Press the power switch or button, and you should see the unit’s display light up or indicators showing that it’s in operation.
- Monitor the inverter display: Many inverters have a display panel that provides information about the solar panel system’s performance. This display may show real-time power production, energy yield, and other relevant data. Keep an eye on the display to ensure the inverter is functioning properly and producing the expected electricity.
- Observe any error messages: If the inverter displays any error messages or warning indicators, consult the manufacturer’s manual or contact technical support for guidance. It’s essential to address any issues promptly to ensure optimal performance and safety.
Remember, the solar inverter is the heart of your solar panel system, and its proper functioning is crucial for maximizing energy production. By following the manufacturer’s instructions and regularly monitoring the inverter’s performance, you can ensure that your solar panels are efficiently converting sunlight into usable electricity.
Step 10: Testing
Once you’ve completed the solar panel installation and connected all the components, it’s crucial to conduct a thorough verification of the system to ensure everything is functioning properly. This step is essential to guarantee the optimal performance and safety of your solar panel system.
Here’s a step-by-step guide to verifying the proper functioning of your solar panel system:
-
Visual inspection: Carefully examine all the connections, wiring, and equipment. Look for any signs of loose connections, damage, or visible wear and tear. Inspect the solar panels, mounting brackets, inverter, and any other components for any anomalies.
-
Check the wiring: Double-check the electrical wiring connections, both DC and AC, to ensure they are secure and properly connected. Ensure that all wires are routed safely and protected with conduit or appropriate wiring methods.
-
Monitor the inverter: Keep an eye on the solar inverter’s display panel or indicators. Look for any error messages or warning lights that may indicate a problem. The inverter should be showing the correct power output and operating within the expected parameters.
-
Test the system: Turn on some of your electrical appliances or lights powered by the solar panel system to verify that they are receiving electricity. Observe their performance and ensure that they are functioning as expected.
-
Monitor energy production: If available, monitor the energy production of your solar panel system. Check the production levels against the expected values for the time of day and weather conditions. This will give you an idea of how efficiently the system is generating electricity.
-
Consult a professional: If you are uncertain about any aspect of the system’s performance or notice any issues during the verification process, it’s advisable to consult a professional solar installer or an electrician. They can perform a comprehensive inspection and address any concerns or problems that may arise.
By conducting a thorough verification process, you can identify any potential issues early on and take the necessary steps to resolve them. It’s important to ensure that your solar panel system is operating optimally to maximize energy production and reap the full benefits of renewable energy.
DIY installation vs Hiring professionals
When it comes to solar panel installation, you have the option of doing it yourself (DIY) or hiring a professional. Both approaches have their advantages and considerations, and it’s important to weigh them carefully before making a decision. Let’s explore the differences between DIY installation and hiring a professional:
DIY Installation
-
Cost savings: One of the primary advantages of a DIY installation is the potential cost savings. By eliminating labor costs, you can significantly reduce the overall expenses associated with installing solar panels.
-
Learning experience: DIY installation allows you to gain valuable knowledge and hands-on experience with solar panel systems. It can be a rewarding learning opportunity that empowers you to understand the technology and maintenance requirements better.
-
Flexibility and control: With DIY installation, you have full control over the process. You can choose the components, design the system according to your specific needs, and work at your own pace. This level of flexibility can be appealing to those who prefer a hands-on approach.
-
Sense of accomplishment: Successfully installing solar panels yourself can bring a great sense of accomplishment and pride. You can take pride in knowing that you’ve played a direct role in harnessing renewable energy for your home.
However, it’s essential to consider the potential challenges and drawbacks of a DIY installation:
-
Technical expertise: Installing solar panels requires a certain level of technical knowledge and skill. You need to understand electrical wiring, safety precautions, and local building codes. If you lack experience in these areas, it may be challenging to execute the installation correctly and safely.
-
Time and effort: DIY installation can be time-consuming and labor-intensive. It involves researching, planning, and executing various steps, including mounting, wiring, and system integration. You need to be prepared to invest significant time and effort into the project.
-
Warranty and support: When you hire a professional installer, they typically offer warranties on their workmanship and provide ongoing support. With DIY installation, you assume full responsibility for any issues that may arise. This can be a concern if you encounter technical difficulties or need assistance in the future.
Hiring a Professional:
-
Expertise and experience: Professional installers have the knowledge, training, and experience to ensure a safe and efficient installation. They are familiar with local regulations, building codes, and industry best practices, which can help avoid potential issues and ensure compliance.
-
Time and convenience: Hiring a professional can save you time and effort. They handle all aspects of the installation, including obtaining permits, procuring materials, and coordinating with utility companies. This allows you to focus on other priorities while the experts take care of the installation.
-
Quality and warranty: Professional installers often provide warranties on their work, giving you peace of mind knowing that the installation is backed by a guarantee. They have access to high-quality equipment and can ensure that the system is installed correctly for optimal performance and longevity.
-
Compliance and safety: Solar panel installations involve electrical work, and safety is paramount. Professional installers are trained to adhere to safety standards and follow proper procedures. They can ensure that the system is installed safely and meets all necessary requirements.
While hiring a professional installer offers many benefits, it’s important to consider the associated costs. Professional installation can be more expensive due to labor and service fees.
Conclusions
In conclusion, installing solar panels yourself can be a fulfilling and cost-effective option for those with the necessary skills and knowledge. It allows you to take control of your energy production, reduce your carbon footprint, and potentially save money on electricity bills. With a step-by-step DIY guide and the right tools, you can successfully install solar panels on your own.
However, it’s important to recognize that solar panel installation is a complex task that requires technical expertise and compliance with local regulations. If you’re unsure about your abilities or if you prefer a hassle-free experience, hiring a professional installer is a wise choice. They bring extensive experience, ensure proper permitting and inspections, and can optimize the system for maximum performance.
Ultimately, the decision between DIY installation and hiring a professional depends on your comfort level, time availability, budget, and desired outcome. Whether you choose to embark on the DIY route or seek professional assistance, the transition to solar energy is a rewarding step towards a greener and more sustainable future.
Remember, safety should always be a top priority. If you’re not confident in your abilities or encounter any challenges during the installation process, it’s recommended to consult a professional to ensure a safe and successful solar panel installation.
Whichever path you choose, congratulations on taking the initiative to embrace renewable energy and contribute to a cleaner environment. Enjoy the benefits of solar power and the satisfaction of knowing you’re making a positive impact.
Frequently Asked Questions (FAQs)